Just about any page on a website will consist of a generic layout. This blog you’re reading right now has a generic layout using Laravel Blade. Other common uses include 404 pages, blog views, and views that have special elements such as a sidebar.
What Does a Laravel Blade Layout Usually Consist Of?
A generic Blade layout usually has your typical !doctype markup, libraries to include your CSS and JavaScript, and anything else you’ll use across all pages like a navbar. You can use Blade partials or components in layouts as well. One very common use of partials in Laravel is a navbar component.
You can learn more about Laravel Partials in this post.
It’s not uncommon to see other site elements like sidebars, navbars, and footers as components inside of the layout file itself.
Making a Generic Layout
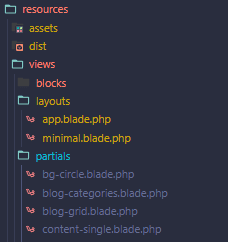
To make your first Laravel layout, it’s typical to create it in a folder called layouts relative to your resources directory. This blog is built on the Sage 9 starter theme, so my default resources directory is in resources/views. I store my layouts there in a directory called layouts.

A generic layout is your app’s default layout. Think of it as the skeleton of each page on your site.
<!doctype html>
<html>
    @include('partials.header')
    <body class="body-classes">
        <main class="content">
            @if(App\sidebar())
                @include('partials.sidebar')
            @endif
            <section class="body-content">
                @yield('content')
            </section>
        <main>
    </body>
    @include('partials.footer')
</html>
This layout provides the base header and footer partial, accounts for an optional sidebar, and has our main wrapper class which is seen as <main class="content">. Since most templates will extend the base generic layout, it’s common to put meta tags and assets here too. In my case, those types of tags exist in the header or footer partial.
DRY (Don’t Repeat Yourself)
It’s smart to put code that applies to multiple layouts in its own partial or component.
Defining wrapper classes in the template allows you to edit the code in one place while applying it to most of your app’s pages. For example, what if you wanted to add a simple container class? Shouldn’t be too hard:
<main class="content">
    <div class="container">
        @if(App\sidebar())
            @include('partials.sidebar')
        @endif
    </div>
<main>
Now we have a “container” class and any page that @extends
Laravel Extends Layout
Extending a layout is pretty easy and can be done from any template. Let’s create our home.php template.
@extends('layouts.main')
@section('content')
    <p>Home page content</p>
@endsection
Our layouts are typically stored in resources/views/layoutsmain.blade.phplayouts.main. When we @extendhome.php template. How do we enter the unique home page content into the template? That’s where @section
@section@slot, similar to a Laravel component.
The Laravel Blade Yield Statement
The content you pass is outputted where a @yield
<!doctype html>
<html>
    @include('partials.header')
    <body class="body-classes">
        <main class="content">
            @if(App\sidebar())
                @include('partials.sidebar')
            @endif
            <section class="body-content">
                {{-- This is where our @content block content is outputted --}}
                @yield('content')
            </section>
        <main>
    </body>
    @include('partials.footer')
</html>
You don’t have to name it content, it can be named anything. If you want to name it maincontent, you’d use @section('maincontent')@yield('maincontent')@yield
Using Multiple Layouts
Using different layouts is a similar process. For example, you might want a layout that only applies to authenticated users. To do that, you probably need to have a special layout. In your relevant templates, you’d extend it with something like @extend('layouts.auth')
Other Layouts You Can Make:
-
layouts/404.blade.php – For error pages
-
layouts/minimal.blade.php – A layout that might have the header and/or footer stripped out. Good for TOS and Privacy Policy pages.
Laying It Out
Now that you know how layouts work, you have the basis for creating any type of page in your project. When you consider partials, conditionals, and loops, there’s already a lot you can do! That’s the beauty of Laravel Blade, it doesn’t take a lot of learning to start getting some real use out of it.


![[Tutorial] Implement Parenthesis Multiplication Using JavaScript & Regex](https://bparkerproductions.com/wp-content/uploads/2023/09/implement-parenthesis-multiplication.png)


Comments