In the last post, we saw how easy and powerful conditional markup can be when using Laravel Blade. In this post, we’ll explore how Laravel Partials can help reduce repetitive code and make life easier. What’s one thing you notice about all websites? They consist of easily repeatable code that is used across each page.
Common examples include:
-
A site navbar
-
A site footer
-
A call-to-action component
-
A blog sidebar
Laravel Blade Partials
A Laravel blade partial is similar to an include or require in PHP. It’s an easy way to include contents of another file inside of a template. A PHP include would look something like 'include file.php'@include@include('partials.file')
The reason we use partials.fileresources/viewsresources/views@includefile.blade.php file directly in that folder, it will look like @include('file')
Where should I put my partials?
Typically, partials are stored under some kind of resources directory in a typical Laravel app. This website uses Blade files that are found under resources/views/partials. How you want to structure them is up to you, the developer. Here’s how I store them:
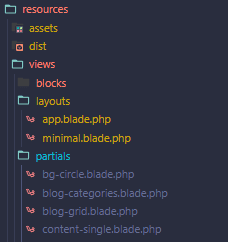
This kind of structure comes out of the box when using something like Sage 9 or 10, which comes with Laravel Blade templates by default.
Any folder structure should work, just keep it in mind when referencing it in your @include statement. In my above example, I refer to the bg-circle.blade.php with @include('partials.bg-circle'). This is because bg-circle.blade.php is in resources/views/partials/bg-circle.blade.php with a base directory of resources/views. I choose to put my partials in its own directory for organization purposes. You are free to keep them in the base directory or nest them.
How To Pass Variables to Laravel Blade Partials
Simply repeating a static block of code only takes you so far. Laravel Blade gives you the power to make dynamic and highly reusable blocks. Let’s see what that looks like.
<ul class="list-unstyled mb-2 d-flex {{$classes}}">
  @foreach( get_field('social_media', 'option') as $social )
    <li>
      <a
        aria-label="{{$social['title']}}"
        title="{{$social['title']}}"
        href="{{$social['link']}}"
      >
        <i class="{{$social['class']}} {{$iconColor}} fa-2x mx-1"></i>
      </a>
    </li>
  @endforeach
</ul>
The above code is a simple partial that displays a list of social media icons that are grabbed from a global ACF field group. Don’t worry if you don’t know what ACF is, it’s not important in this example. What’s important is the $classes and $iconColor variables. If you haven’t guessed, these have to be passed in from somewhere.
Here’s how I’d call the social-media.blade.php file that resides in resources/views/partials/social-media.blade.php.
@include('partials.social-media', [
    'iconColor' => 'text-white',
    'classes' => 'mb-0 mt-3'
  ])
Aha! You can pass variables with an array in the @include statement. You can include as little or as many variables as you like.
Make sure you pass variables in the camel case format. i.e.: iconColor vs icon-color.
Laravel Blade Partial Conditional Variables
What if you only need to pass an $iconColor to one @include directive but not the others? For example, you might have 3 CTA partials across 3 different pages but want one of them to be a different color. All you have to do is account for it in your Blade file. One quick and easy hack is to use $variable ?? 'default value'. The ?? here outputs the default value unless $variable exists. You can also use @if @else blocks to check if the value exists, just like you would in a normal PHP template.
You can learn about Laravel Blade @if @else blocks in my previous post.
@if (isset($variable))
  {{ $variable }}
@endif

{{-- OR --}}

{{ $variable ?? 'some value' }}
Partials in Laravel Are Awesome!
By far, partials and components are among my favorite features for Laravel Blade. Not sure what components are? You can check out the above link and find out for yourself. Components are even more powerful versions of partials. Components have the @slot directive, which let you pass entire blocks as an argument instead of just variables, which is where partials fall short.
![[Tutorial] Implement Parenthesis Multiplication Using JavaScript & Regex](https://bparkerproductions.com/wp-content/uploads/2023/09/implement-parenthesis-multiplication.png)


Comments