If you’re here, you’ve probably already gone through part 1 of the series. In that post, we covered why SASS is so great and the basics of what it does. This post will be all about getting set up with a basic build process so we can actually start using it on projects. Unfortunately, SCSS won’t work out of the box. Some browsers don’t understand what SCSS syntax is, so we need to compile it down to a plain CSS file for them.
Setting up a build process may sound slightly daunting, but it’s actually really easy! If you use a pre-defined build, it may even be set up for you! With the popularity of SASS, there’s a good chance that it is. If you’re building your site from scratch, it’s easy to use something like Gulp if all you need are a few build tools. That’s what we will be using in this tutorial.
Why Do We Need To Compile In The First Place?
As briefly mentioned above, browsers don’t understand what SCSS/SASS syntax is. Mixins, nesting, variables, and other SASS features are ultimately compiled down to a basic css file. You can actually see what’s happening using this tool.
Try entering this bit of code and clicking “compile scss”.
@mixin flex-center {
    display: flex;
    justify-content: center;
}

.container {
    display: flex;

    .inner-container {
        @include flex-center();
    }
}
If you look on the right side of the screen, it spits out plain css. This is a crude example, but this is what’s happening behind the scenes. Thousands of lines get compiled to css every time a build is processed! In addition, this code can be “beautified”, auto-stripped of comments and white space, and minified. This is often done for performance reasons when the css file is served to the end user. All of this is done with a build system like Gulp.
What are Build Tools?
Build tools are what can compile SCSS to css, but they can do so much more. There are several popular options, with webpack being one of the most popular at the time of this writing. There are many reasons to use webpack over Gulp, but for this use case Gulp works fine. You can check out their documentation here.
Build tools allow you to use “tools” that are specifically for development. These tools vary so much that there are countless options out there. These tools are usually packaged into code that can be downloaded and imported into your project. These packages are usually uploaded and managed with a package manager such as NPM.
Breaking Down a Gulpfile
We won’t dive too deep here, but the basics are fairly easy to grasp.
var gulp = require('gulp');
var autoprefexer = require('gulp-autoprefixer');
var sass = require('gulp-sass');

//prefixes
gulp.task('prefix', function(){
	gulp.src('build/main.css')
	.pipe(autoprefexer({
		overrideBrowserslist: ['last 2 versions']
	}))
	.pipe(gulp.dest('build'))
});

//compile scss
gulp.task('sass', function() {
  return gulp.src("css/scss/global/main.scss")
    .pipe(sass().on('error', sass.logError))
    .pipe(gulp.dest('build'))
});

/*
 * Watch prefixes
 */
gulp.task('watch', function() {
	gulp.watch('css/scss/**', gulp.series('sass'));
});
The libraries
As you can see, it’s just JavaScript. The file is using three modules: gulp, autoprefixer, and sass. Importing gulp is just importing the library itself. The other two is what will allow us to compile the scss code. gulp-sass is an npm package that compiles the SCSS code. gulp-autoprefixer will add browser-specific prefixes for you, but it’s not completely necessary here.
Tasks
You may notice that each group of code is being passed through a gulp.taskgulp.watchsass task being called through gulp.series('sass')
The gulp.series() function isn’t necessary here since it’s used to call multiple tasks in order. It’s good to have it in case you want to chain tasks later on in your project’s lifecycle.
Watching for file changes
Here’s where the real magic happens. When you run a watch command, it continually listens for file changes in a certain directory. In this case, it’d be from the css/scsscss/scss/*css/scss/main.scsssass. This watch command is a process that needs to be started, but we’ll get to that.
The sass task
//compile scss
gulp.task('sass', function() {
  return gulp.src("css/scss/global/main.scss")
    .pipe(sass().on('error', sass.logError))
    .pipe(gulp.dest('build'))
});
This bit of code may be confusing, but what it does is pretty straightforward. If in doubt, just copy it and edit the gulp.srcscss file is.
When this task runs, it takes every bit of scss and compiles it to your site’s main css file. In this case, it’s built to the build directory specified in gulp.dest. gulp.src is the file where all of your scss code is. When you create a scss structure, there will be a single file that imports every module/component. This is your entry file. Your entry file will be processed, then converted to a css file that is specified in gulp.dest
TL;DR: This task takes everything from css/scss/global/main.scssbuild/main.css
Setting Up a Basic Build
Now that you know what a gulpfile does, it’s time to set up the actual project! Getting up and running isn’t too bad as you’ll see here in a second. In short: you set up a basic file structure, install dependencies, then run the process.
For starters: copy the below code and place it into a file called gulpfile.js
var gulp = require('gulp');
var sass = require('gulp-sass');

//compile scss
gulp.task('sass', function() {
  return gulp.src("css/scss/main.scss")
    .pipe(sass().on('error', sass.logError))
    .pipe(gulp.dest('build'))
});

/*
 * Watch prefixes
 */
gulp.task('watch', function() {
	gulp.watch('css/scss/**', gulp.series('sass'));
});
Set up your file structure
I briefly mentioned an entry file and the build directory. The entry file is a file that contains every bit of your SCSS code. In the above file, I made the entry file css/scss/main.scssscss subdirectory that contains a main.scss file. This file will contain all of your @imports and styles. Other .scssscss directory.
Your build directory will be made automatically, so no need to manually create it. Your file structure should currently look like this:
- gulpfile.js
- css
    - scss
        - main.scss(entry file)
You can make your directory structure whatever you want, this is just what I prefer.
Install dependencies
We’re using npm to install dependencies. First thing’s first, we need the Gulp library itself. We need to install this globally. Assuming you have node and npm installed already, run npm install -g gulp. This installs it system wide as opposed to installing on a project-by-project basis. The rest of our dependencies will be installed locally.
The only library we need will be gulp-sass, so install it like this: npm install gulp-sasspackage.jsonpackage-lock.jsonnode_modules
Running the process
Now that everything is set up, let’s make sure we test everything to make sure it works. You may have scss code in your main.scss
@mixin flex-center {
  display: flex;
  justify-content: center;
  align-items: center;
}

.container {
  width: 100%;

  .inner-container {
    @include flex-center;
  }
}
We want this code to build every time we make a change and save in any of our .scss
That’s where this comes into play:
/*
 * Watch prefixes
 */
gulp.task('watch', function() {
	gulp.watch('css/scss/**', gulp.series('sass'));
});
Before running the next command, paste this code into your main.scss
@mixin flex-center {
  display: flex;
  justify-content: center;
  align-items: center;
}

.container {
  width: 100%;

  .inner-container {
    @include flex-center;
  }
}
To run this, you’ll need to open up a terminal and go to the directory where your project is. Once you’re there, run gulp watch. That’s it! Go make a change and see what happens. You should see something like this in your terminal:
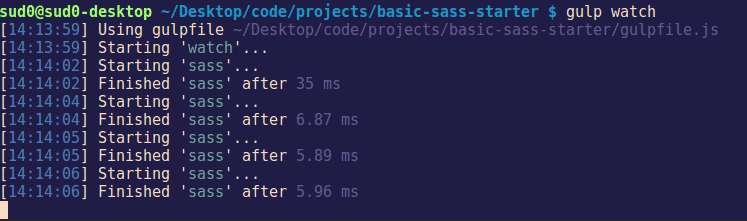
If you see an error: you may need to troubleshoot. Unfortunately things won’t always work perfectly depending on your package versions, local environment, etc. Let’s hope for the best!
Testing the output
Now that our process is started and we have some scss to test with, let’s check our build directory! When you make a change, the build directory will pop up with the compiled main.css
To test if everything worked, check that .cssgulp-sass
.container {
  width: 100%; }
  .container .inner-container {
    display: flex;
    justify-content: center;
    align-items: center; }
That’s pretty much it! Whenever you develop your site or app, you have to run gulp watch and you’re good to go!
Now Let’s Learn SASS
This isn’t the only way to set up a build, and sometimes it’s already done for you. However, it’s nice to know how it works and how to implement it in small projects. Now that we know how a build works, it’s time to dive deeper! Next in our SASS journey is diving into variables and nesting basics. Simple concepts, but a great start! Hope to see you there soon.

![[Demo] React.js Modal Using The Hooks API](https://bparkerproductions.com/wp-content/uploads/2023/09/demo-react-js-modal-using-the-hooks-api.png)


Comments